Contact Us Live Chat or 1-888-958-2959
My Garage
My Account
Cart
Make sure this part fits

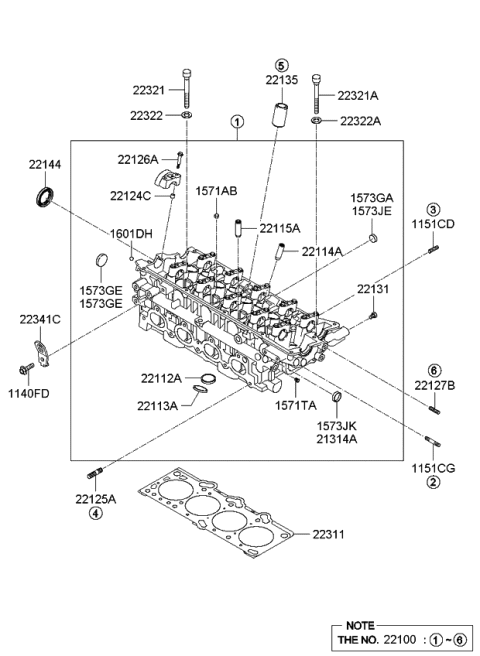
Kia 2210023780 Head Assembly-Cylinder

2003-2011 Kia

Customer Questions & Expert Answers (8)
Kia 2210023780 Head Assembly-Cylinder
  • Part Description
    Head Assembly-Cylinder
  • Part Code
    22100
  • Replaces
    2210023760, 2210023630
  • Manufacturer
    Kia
Make sure this part fits
$1266.86 MSRP: $1860.30
You Save: $593.44 (32%)
Ships in 1-3 Business Days
1
ADD TO CART
  • Related Parts
  • Product Specifications
  • Vehicle Fitment
  • Customer Questions & Expert Answers
  • Product Specifications

    BrandGenuine Kia
    Part Code22100
    Manufacturer Part Number2210023780
    Part DescriptionHead Assembly-Cylinder
    Other NamesCylinder Head
    Item Weight37.00 Pounds
    ConditionNew
    Fitment TypeDirect Replacement
    Replaces2210023760, 2210023630
    ManufacturerKia
    SKU2210023780
    WarrantyThis genuine Kia part is guaranteed by Kia's factory warranty.
    Shipping & ReturnShipping Policy Return Policy
    Warning: California’s Proposition 65
  • Vehicle Fitment

    Year Make Model Trim & Engine Important vehicle option details
    2009-2011 Kia Soul2.0L - BetaWagon - 5Door 5P
    2003-2009 Kia SpectraHigh Grade, Middle Grade|2.0L, 2.0L - Beta4 Door Sedan, 5 Door Sedan, Sedan - 4Door 5P
    2007-2009 Kia Spectra SX2.0L - BetaSedan - 4Door 5P, Sedan - 5Door 5P
    2007-2009 Kia Spectra5 SX2.0L - BetaSedan - 4Door 5P, Sedan - 5Door 5P
    2005-2010 Kia SportageHigh Grade, Middle Grade|2.0L, 2.0L - Beta5 Door Wagon, Wagon - 5Door 5P
  • Customer Questions & Expert Answers

    Q:
    Can you please confirm fitment and describe this part? Posted by KiaPartsNow Specialist
    A:
    You can Select Your Vehicle to check if 2210023780 fits your vehicle.
    Posted by KiaPartsNow Specialist
    Q:
    What steps should be followed to remove and install a cylinder head on Kia Spectra for four cylinder engine? Posted by Customer
    A:
    In undertaking of this process, the engine must be cold to the least extent. For all other engines apart from the 2.0L DOHC, initial steps entail relieving the fuel pressure, with the permission to ground the negative terminal of the car battery, as well as disconnecting it, removing the spark plugs, flushing out the coolant from both the engine block and the radiator, and also draining the engine oil and taking out the oil filter in the process. Then disconnect the air intake duct and air filter housing, and then dismantle distributor on cars produced up to 1993, or the camshaft position sensor for a car built in the period from 1994 to 1997, or the emission control module on a car manufactured from 1998. Continue on the cylinder head and intake/exhaust manifolds, take off all electrical connections and harnesses connected to the cylinder head, and if applicable, the thermostat and water by-pass line. Take off the drive belts as well as the water pump pulley and then proceed to take off the timing belt covers and the timing belt it's self and finally the valve cover. Get rid of any other remaining parts that will hinder cylinder head extraction; proceed to extract the camshafts so as to reveal bolts of the head. Tighten the cylinder head bolts evenly by turning them around the block in a pattern clockwise and anticlockwise by a 1/4 turn and then fully unsticking them by turning them counterclockwise and lifting the cylinder head off the engine block recomending using a pry bar if it is lodged in place. Position the cylinder head on wooden block to restrict the gasket sealer surface and remove other related components to clean and inspect them. Choose the application of gaskets so that the mating surfaces of the cylinder head and block are absolutely clean, then use a gasket scraper and clean the surface with lacquer thinner or acetone. Search for any harm on the mating surfaces and the head bolt threads; ensure you do not remove metal from threads using a thread die. Replace those components extracted from the head by placing a new one and aligning it over the dowel pins; thereafter, lower the head on the block don't move the gasket. Pour the clean engine oil on the thread of the head bolts, screw them on until they are hand tight, then go on to tighten them according to the instructions, in stages, up to the requisite level of torque. The remaining installation procedures are in fact the reversal of the removal procedures, to add water to the cooling system, replace the oil filter, add oil to the crankcase, and check for leakage after running the engine, and finally, set the distributor timing for those models provided with this component. In regard to the 2.0L DOHC engine, it is possible to remove the head with the intake and exhaust manifold set if only the head gasket was replaced or cylinder block was serviced. First clear the coolant through the coolant drain plug, remove the upper connection of the radiator hose together with other hoses, if you intend to take off the cylinder head then you remove the spark plugs and their wires and the ignition coil also. Remove the valve cover and the timing belt cover after which you remove the timing belt together with the camshafts and the lifters. If you are pulling the cylinder head, remove the fuel rail and injectors, or just unplug the fuel injector connectors and stash the injector cables to the side/s if not removing. The associated procedures are to detach the power steering pump and the bracket and in some instances; it is required to eliminate the intake and the exhaust manifolds. Tighten the cylinder head bolts in the specified sequence cautiously to such a degree that they could easily be turned by hand. Replace the bolts. Raise the head off the block to confirm that there are no interconnections to it and pull out the gasket off the top block to have it compared to the new one. Scrub the mating surfaces of the cylinder head and block by feeling for roughness and checking for and preventing any grit from entering the oil or coolant galleries. If removed, then reinstall the intake and exhaust manifolds, clean out the cylinder head bolt holes, and ensure that the piston in the No. 1 cylinder is at the top dead center. Align the new head gasket on the block and then align the cylinder head and manifolds and then use oil on the threads as well as the lower area of the bolt heads and then tighten the bolts in a triangular pattern. Place the rest of the structures in their proper positions, connect the hoses that supply coolant, replace the lost coolant, change the engine oil and start the vehicle for the inspection of the leakage.
    Posted by KiaPartsNow Specialist
    Q:
    What steps should be followed to remove and install a cylinder head on Kia Sportage for four cylinder engine? Posted by Customer
    A:
    In undertaking of this process, the engine must be cold to the least extent. For all other engines apart from the 2.0L DOHC, initial steps entail relieving the fuel pressure, with the permission to ground the negative terminal of the car battery, as well as disconnecting it, removing the spark plugs, flushing out the coolant from both the engine block and the radiator, and also draining the engine oil and taking out the oil filter in the process. Then disconnect the air intake duct and air filter housing, and then dismantle distributor on cars produced up to 1993, or the camshaft position sensor for a car built in the period from 1994 to 1997, or the emission control module on a car manufactured from 1998. Continue on the cylinder head and intake/exhaust manifolds, take off all electrical connections and harnesses connected to the cylinder head, and if applicable, the thermostat and water by-pass line. Take off the drive belts as well as the water pump pulley and then proceed to take off the timing belt covers and the timing belt it's self and finally the valve cover. Get rid of any other remaining parts that will hinder cylinder head extraction; proceed to extract the camshafts so as to reveal bolts of the head. Tighten the cylinder head bolts evenly by turning them around the block in a pattern clockwise and anticlockwise by a 1/4 turn and then fully unsticking them by turning them counterclockwise and lifting the cylinder head off the engine block recomending using a pry bar if it is lodged in place. Position the cylinder head on wooden block to restrict the gasket sealer surface and remove other related components to clean and inspect them. Choose the application of gaskets so that the mating surfaces of the cylinder head and block are absolutely clean, then use a gasket scraper and clean the surface with lacquer thinner or acetone. Search for any harm on the mating surfaces and the head bolt threads; ensure you do not remove metal from threads using a thread die. Replace those components extracted from the head by placing a new one and aligning it over the dowel pins; thereafter, lower the head on the block don't move the gasket. Pour the clean engine oil on the thread of the head bolts, screw them on until they are hand tight, then go on to tighten them according to the instructions, in stages, up to the requisite level of torque. The remaining installation procedures are in fact the reversal of the removal procedures, to add water to the cooling system, replace the oil filter, add oil to the crankcase, and check for leakage after running the engine, and finally, set the distributor timing for those models provided with this component. In regard to the 2.0L DOHC engine, it is possible to remove the head with the intake and exhaust manifold set if only the head gasket was replaced or cylinder block was serviced. First clear the coolant through the coolant drain plug, remove the upper connection of the radiator hose together with other hoses, if you intend to take off the cylinder head then you remove the spark plugs and their wires and the ignition coil also. Remove the valve cover and the timing belt cover after which you remove the timing belt together with the camshafts and the lifters. If you are pulling the cylinder head, remove the fuel rail and injectors, or just unplug the fuel injector connectors and stash the injector cables to the side/s if not removing. The associated procedures are to detach the power steering pump and the bracket and in some instances; it is required to eliminate the intake and the exhaust manifolds. Tighten the cylinder head bolts in the specified sequence cautiously to such a degree that they could easily be turned by hand. Replace the bolts. Raise the head off the block to confirm that there are no interconnections to it and pull out the gasket off the top block to have it compared to the new one. Scrub the mating surfaces of the cylinder head and block by feeling for roughness and checking for and preventing any grit from entering the oil or coolant galleries. If removed, then reinstall the intake and exhaust manifolds, clean out the cylinder head bolt holes, and ensure that the piston in the No. 1 cylinder is at the top dead center. Align the new head gasket on the block and then align the cylinder head and manifolds and then use oil on the threads as well as the lower area of the bolt heads and then tighten the bolts in a triangular pattern. Place the rest of the structures in their proper positions, connect the hoses that supply coolant, replace the lost coolant, change the engine oil and start the vehicle for the inspection of the leakage.
    Posted by KiaPartsNow Specialist
    Q:
    What should be done with the cylinder head bolt holes for the 2001 Kia Spectra? Posted by Customer
    A:
    Chase the threads in the cylinder head bolt holes with a tap of the correct size and clean the holes with compressed air.
    Posted by KiaPartsNow Specialist
    Q:
    What should be done after tightening the bolts for the 2006 Kia Sportage? Posted by Customer
    A:
    Complete the remaining installation steps in reverse order of removal, refill the cooling system, change the oil and filter, run the engine, and check for leaks.
    Posted by KiaPartsNow Specialist
    Q:
    Can you please provide the part numbers for the valves and cams? Thank you. Posted by Customer: 2008 Kia Spectra SX or Spectra5 SX
    A:
    24100-23770 IS THE INTAKE CAMSHAFT (QUANITY1) 24200-23770 IS THE EXHAUST CAMSHAFT (QUANITY1) 22211-23600 IS THE INTAKE VALVES (QUANITY8) 22212-23600 IS THE EXHAUST VALVES (QUANITY8)
    Posted by KiaPartsNow Specialist 21/10/2016
    Q:
    Does this assembly come with valves and cams? If not do you have a part number for a complete assembly. Posted by Customer: 2008 Kia Spectra SX or Spectra5 SX
    A:
    THIS ASSY DOES NOT COME WITH VALVES OR CAMS. YOU HAVE TO BUY EVERYTING SEPARATE. THERE IS NO PART NUMBER FOR COMPLETE ASSY
    Posted by KiaPartsNow Specialist 20/10/2016
    Q:
    Can you please confirm that the following part will not be included with this part number; 1140FD, 22321, 22321A, 22311, 22341C, 22144, 22322, 22322A ? Posted by Customer: 2008 Kia Spectra SX or Spectra5 SX
    A:
    PART NUMBER 22100-23780 DOES NOT INCLUDE ALL OTHER NUMBERS THAT YOU GAVE. YOU HAVE TO PURCHASE THOSE SEPARATELY.
    Posted by KiaPartsNow Specialist 19/10/2016
    If you have any questions about this product, please don't hesitate to ask us. We will be happy to help you!

Genuine Kia Part 2210023780, the Right Choice

To ensure reliability, purchase Kia part # 2210023780 Head Assembly-Cylinder. It is sometimes referred to as Kia Cylinder Head. OEM parts are the best in terms of quality. They are made following Kia's official factory standards to ensure their durability and fit. These parts go through rigorous quality control tests to minimize any flaws or imperfections. This part fits 2009-2011 Kia Soul, 2003-2009 Kia Spectra, 2007-2009 Kia Spectra SX, 2005-2010 Kia Sportage.

KiaPartsNow.com is a leading supplier of genuine Kia parts and accessories such as Kia 2210023780 Head Assembly-Cylinder. Should you require any OEM Kia parts, our website should be your go-to destination. We boast an extensive selection of genuine Kia parts, offered at prices that outshine even the most affordable aftermarket alternatives. Plus, our easy return policy and rapid delivery service are designed to provide you with the most satisfying shopping experience possible.

Why choose Kia Parts Now

  • Dedicated Service

    Your complete satisfaction is our #1 goal

  • Lowest Prices

    Best deals on genuine OE parts from dealerships

  • Fast Delivery

    Orders are processed and delivered promptly